How to Use a Portable Mortar Sprayer for Wall Plastering?

Time:2026-09-22 Author:Oliver
0%

Portable mortar sprayers can turn a slow plastering task into a controlled, repeatable process. Yet the machine is not a shortcut for preparation. This guide explains how to use a portable mortar sprayer for wall plastering, from checking the surface to applying an even coat. It focuses on practical decisions that affect adhesion, texture, and finish quality.

A reliable result begins with a sound wall. Remove dust, loose paint, grease, and weak material before mixing mortar. Dampen absorbent masonry, but avoid leaving standing water. Follow the sprayer manufacturer’s instructions for hose size, nozzle selection, pressure, and compatible mixes. Mortar that feels too stiff may clog the line. A watery mix can sag or weaken the coat. Small test patches reveal problems early. They also show how quickly the wall accepts the material.

During operation, keep the nozzle roughly perpendicular and move it steadily. Overlap each pass slightly. Wear eye protection, gloves, suitable work clothing, and respiratory protection when dust exposure requires it. Keep the hose free from sharp bends. Stop immediately if pressure changes or the nozzle blocks. Never force a blockage while the pump is pressurized. Clean the hopper, hose, and nozzle after use, following the equipment guidance. That step feels tedious. It often prevents the next failure. Work carefully. This guide encourages honest evaluation and steady improvement instead of relying on machine speed alone.
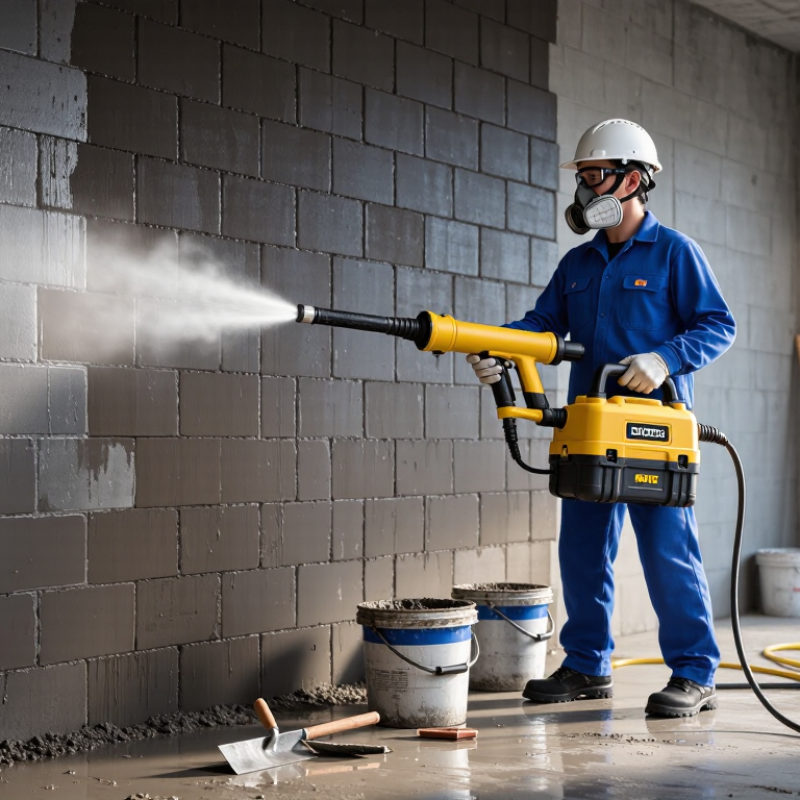
How to Use a Portable Mortar Sprayer for Wall Plastering?

Check the Wall and Gather the Required Tools

Before using a portable mortar sprayer, inspect the wall in strong daylight. Look for loose plaster, hollow areas, deep cracks, oil stains, and flaking paint. Tap suspicious spots with a metal tool and listen for a dull sound. These areas may need removal and repair before spraying.

The surface should be firm, clean, and slightly damp, but not wet. Excess water can weaken adhesion. A dry wall may pull moisture from the mortar too quickly. Check corners and joints carefully because they often need extra attention. I once overlooked dust along a ceiling edge, and the fresh coat separated there. That mistake was avoidable.

Gather the sprayer, suitable mortar, mixing bucket, paddle mixer, clean water, trowel, hawk, brush, sponge, level, and measuring container. Wear safety glasses, gloves, a dust mask, and sturdy work shoes. Cover floors and nearby openings with protective sheets. Keep a clean water source nearby for flushing the hose. Confirm that the power supply is safe and that connections remain dry. Read the equipment instructions before assembly. The mortar should be smooth enough to pass through the hose without becoming watery. Test a small patch first. It may reveal poor consistency, uneven pressure, or an imperfect wall preparation.

Prepare and Mix the Mortar for Spraying

Preparing mortar correctly is the most important part of using a portable mortar sprayer for wall plastering. I measure clean water with a marked container, rather than guessing by eye. Small errors can change the mortar’s flow and weaken the finished coat. I add the dry mix gradually while the mixer runs at a low, steady speed. This reduces dry pockets and limits trapped air.

The mortar should move smoothly through the hose without dripping from the wall. Too stiff, and the sprayer may strain or clog. Too wet, and the plaster can sag, shrink, or lose strength.

I mix for the time recommended for the material, then let it rest briefly when the instructions require it. After remixing, I test a small patch before covering the wall. This step often reveals a poor ratio.

Do not add water simply because spraying feels difficult. Check the nozzle, hose, and filter first. I once corrected a clogged filter by adding water, which made the next section run badly. The mistake was avoidable. Keep the mixture protected from dust and direct heat, and discard mortar that has begun setting. Wear gloves, eye protection, and suitable respiratory protection during mixing.

Set Up and Test the Portable Mortar Sprayer

Before wall plastering, place the portable mortar sprayer on firm, level ground near the mixing area. Inspect the hose, nozzle, clamps, seals, and power cable for damage. Tighten every connection by hand before starting the machine. Wear gloves, eye protection, a dust mask, and suitable work clothing. Keep the spray area clear of loose tools and standing water.

Prepare the mortar according to the equipment instructions, using clean water and a consistent mixing method. The material should flow smoothly without becoming watery. Too stiff, and the hose may clog. Too thin, and the plaster can sag on the wall. Connect the hose, open the material valve slightly, and run clean water through the system briefly. This helps confirm that the passage is open.

Now test the sprayer on a scrap board or hidden wall section. Start with low pressure and hold the nozzle about 30 to 50 centimeters from the surface. Move your arm steadily, keeping the nozzle perpendicular to the wall. Watch the spray pattern for pulsing, uneven coverage, or sudden drips. Adjust pressure or mortar consistency in small steps. I once increased pressure too quickly and created heavy patches near the lower edge. That mistake showed me why a short test matters. Check the hose again after testing, because small leaks often appear only under pressure.

How to Use a Portable Mortar Sprayer for Wall Plastering? - Set Up and Test the Portable Mortar Sprayer

Practical setup and test reference for preparing a portable mortar sprayer before applying cement-based wall plaster.

Step Data Dimension Recommended Setup or Test Data Inspection Method Expected Result
1 Work area and substrate Clean, sound masonry or concrete; remove dust, loose particles, oil, and weak coatings. Dampen highly absorbent masonry without leaving standing water. Brush or blow off the wall, then visually check for loose material, cracks, and surface contamination. Ready
2 Personal protective equipment Safety goggles, protective gloves, long sleeves, safety footwear, and suitable respiratory protection for cement dust and airborne spray. Confirm that all operators are wearing correctly fitted protective equipment before dry mixing or spraying. Complete
3 Machine inspection Check the hopper, rotor or pump chamber, hose, couplings, nozzle, clamps, electrical cable, and emergency stop. Keep the machine switched off during inspection. Look for cracks, blocked passages, damaged seals, loose connections, and exposed electrical conductors. No defects
4 Power supply Use a grounded power source with voltage and frequency matching the equipment rating. Protect the circuit with an appropriate residual-current device where required. Check the equipment nameplate and verify that the extension cable, plug, and circuit are suitable for the machine load. Stable power
5 Compressed-air connection Connect a clean, dry air supply. A practical starting range for many small spray systems is approximately 6–8 bar at the supply, subject to the machine manual and nozzle size. Open the air valve briefly and inspect the gauge, hose, and fittings for pressure loss or audible leaks. No leaks
6 Mortar selection Use a pumpable, cement-based plaster or mortar with aggregate size compatible with the selected hose and nozzle. Avoid material containing hardened lumps or foreign objects. Confirm the product instructions, maximum aggregate size, working time, and required water range before mixing. Compatible mix
7 Mix consistency Mix only enough material for the stated working time. The mortar should be cohesive and pumpable, not watery, dry, or prone to rapid separation. Perform a visual consistency check and verify that the mix flows through the hose without excessive dripping or blockage. Uniform mix
8 Hopper loading Fill the hopper gradually and keep the material above the pump inlet during operation. Do not exceed the hopper’s marked capacity. Check that the inlet remains covered and that no large lumps bridge across the hopper opening. Continuous feed
9 Hose and nozzle arrangement Lay the mortar hose as straight as practical, avoid sharp bends, and secure all couplings. Hold the nozzle perpendicular to the wall at a typical working distance of about 150–300 mm. Inspect the complete hose route and confirm that the operator can control the nozzle without twisting the hose. Unrestricted flow
10 Water or priming procedure Prime the hose only according to the equipment and material instructions. Some systems use a compatible slurry or wetting procedure to reduce initial friction. Confirm that the priming material is compatible with the mortar and that excess water is not left inside the hose. Primed safely
11 Initial spray test Spray onto a test board or small wall section for approximately 30–60 seconds before full application. Begin with moderate material and air flow. Observe the spray pattern, rebound, hose vibration, material flow, and surface coverage. Even pattern
12 Nozzle distance and angle Maintain a consistent distance of approximately 150–300 mm and keep the nozzle close to perpendicular to the surface. Move the nozzle steadily at a constant speed and compare the test area for uniform thickness and texture. Consistent coating
13 Spray output adjustment Adjust air pressure, material feed, and nozzle opening in small increments. Avoid increasing pressure excessively to compensate for an unsuitable mortar mix. Stop the machine before clearing a blockage or changing internal components, then retest after adjustment. Controlled output
14 Plaster application pattern Apply in overlapping horizontal or vertical passes. Build the required thickness in manageable layers rather than attempting an excessively thick single pass. Check overlap, coverage, adhesion, and surface uniformity across the test section. Uniform coverage
15 Blockage response Release pressure, switch off the machine, isolate the power and air supply, and follow the manufacturer’s safe clearing procedure. Never inspect a pressurized hose by hand. Verify zero pressure before disconnecting any hose, coupling, nozzle, or pump component. Pressure released
16 Cleaning after testing Clean the hopper, pump chamber, hose, nozzle, and tools before the mortar hardens. Use only cleaning methods permitted for the equipment. Flush and inspect the material path until no hardened residue remains, then store components dry and protected. Clean system

Important: Pressure, nozzle size, material consistency, hose length, and output vary by equipment and mortar formulation. Always follow the equipment manual and the mortar manufacturer’s technical data, and confirm the final settings with a small test area before full-scale wall plastering.

Apply Plaster in Controlled, Even Passes

Using a portable mortar sprayer can make wall plastering faster and more consistent. The result depends heavily on controlled, even passes rather than maximum spraying speed. I check that the wall is clean, slightly damp, and free from loose dust. The mortar should have a smooth, workable texture without becoming watery. A small test batch helps confirm the flow before covering the wall.

Hold the sprayer about 30 to 45 centimetres from the surface. Keep the nozzle perpendicular to the wall. Move your arm steadily from side to side, maintaining the same distance throughout each pass. Overlap each stroke slightly to prevent thin gaps. Avoid stopping directly against the wall, or one area may receive too much material. Keep moving.

I usually apply a thin bonding layer before building thickness gradually. This reduces sagging and makes leveling easier. Watch the corners carefully, since spray coverage can become uneven there. After several passes, inspect the surface from different angles. Uneven shadows often reveal shallow patches that are easy to miss.

Do not chase speed.

If the mortar begins to splatter, I stop and check the mix, hose, and nozzle. I have sometimes blamed the sprayer when the real problem was inconsistent mixing. That mistake wastes material and weakens the finish. A straightedge can confirm the surface, but visual judgment still matters. Weather also changes drying time, so I adjust the working rhythm when the wall dries too quickly.

Level, Finish, and Clean the Plastered Wall

How to Use a Portable Mortar Sprayer for Wall Plastering?

A portable mortar sprayer can cover a wall quickly, but speed does not guarantee a flat finish. I begin with a clean, dampened surface and check the substrate for loose dust, cracks, and uneven suction. I mix mortar to a steady, pumpable consistency, then test the spray pattern on scrap board. The nozzle should stay perpendicular to the wall, about 300–500 millimeters away. I move in overlapping passes, keeping pressure and distance consistent.

Work in manageable sections. Apply enough mortar to create an even coat, not a heavy ridge. After the surface firms slightly, I use a straightedge from bottom to top, filling hollows and removing excess material. A steel trowel then closes small marks, while a sponge float can improve texture. The U.S. Bureau of Labor Statistics continues to identify construction work as a high-risk field, so stable footing, eye protection, gloves, and suitable respiratory protection matter during spraying and leveling.

Do not rush this stage. My first pass is rarely perfect. Small waves become obvious under side lighting. I recheck the wall with a long level before the mortar hardens. Clean the hose, nozzle, hopper, and mixing tools immediately with water and the approved procedure. Hardened mortar can restrict flow and damage equipment. The U.S. Environmental Protection Agency reported approximately 600 million tons of construction and demolition debris in 2018, so controlling overspray and collecting waste also supports responsible site practice. Still, cleanup is often the step workers underestimate.

FAQS

How should mortar be mixed for a portable sprayer?

Measure clean water with a marked container. Add dry mix gradually while the mixer runs slowly. Mix until smooth and workable. Let it rest briefly when required, then remix.

How can I tell if the mortar consistency is correct?

The mortar should travel smoothly through the hose without dripping from the wall. A stiff mix may clog the system. A watery mix can sag, shrink, or weaken the plaster. Test a small patch first.

What should I check if spraying becomes difficult?

Check the nozzle, hose, and filter before adding water. A blockage may be causing the problem. I once added water too quickly and made the next section worse.

How far should the nozzle stay from the wall?

Keep it about 30 to 45 centimetres from the surface. Hold the nozzle perpendicular to the wall. Maintain the same distance during each pass.

What spraying movement gives an even coat?

Move steadily from side to side. Overlap each stroke slightly to avoid thin gaps. Keep moving. Do not chase speed.

Should plaster be applied in one heavy layer?

A thin bonding layer usually works better. Build thickness through several controlled passes. Heavy application can create ridges and sagging. Corners need extra attention because coverage may become uneven.

How can I find shallow areas after spraying?

Inspect the wall from different angles. Side lighting can reveal small waves and shadows. Use a straightedge or long level after the mortar firms slightly. My first pass is rarely perfect.

How should the plaster be leveled and finished?

Move a straightedge from bottom to top. Fill hollows and remove excess mortar. Use a steel trowel for small marks. A sponge float can adjust the surface texture.

What safety and cleanup steps matter?

Wear gloves, eye protection, and suitable respiratory protection. Use stable footing while spraying and leveling. Clean the hose, nozzle, hopper, and tools immediately with water and the approved procedure. Hardened mortar can restrict flow.

Conclusion

This guide explains how to use a portable mortar sprayer for wall plastering in a safe, efficient, and controlled way. Begin by inspecting the wall, removing dust or loose material, repairing major defects, and gathering the necessary tools, including protective equipment, mixing containers, a trowel, and leveling tools. Prepare the mortar according to the required consistency, mixing it thoroughly so it is smooth enough to spray without becoming too runny or clogging the equipment.

Next, assemble the sprayer, check all connections, and perform a short test spray to confirm the flow and pressure. Apply the plaster in steady, overlapping passes while maintaining a consistent distance from the wall. Work in manageable sections and avoid applying overly thick layers at once. After spraying, level the surface with a straightedge, smooth or texture it as desired, and allow it to set properly. Finally, clean the sprayer, hoses, and tools immediately to prevent hardened mortar from affecting future performance.

Oliver

Oliver

Oliver is a seasoned marketing professional with a wealth of expertise in driving brand awareness and engagement. With a deep understanding of our company's product offerings, he consistently delivers high-quality content that enriches our professional blog. His insights not only shed light on......